Friday, October 28, 2011

They're Crazy and They're Kooky: Halloween (Fitness) Tricks & Treats

HALLOWEEN HAS ARRIVED!!!!!!! Woohoo! I've always LOVED this holiday! When I was young, I'd head out trick or treating with my cousins and as I got older, my friends and I always went BIG for the occasion, sometimes having more than three costumes to celebrate all week! One of my all-time favorite Halloweens was two years ago when I spent it in Texas with my beautiful family.
T doing his best impression of Tigger.

This year, I'll be in the City celebrating and I've got a few 
things here to kick off the weekend properly!


First, a recipe that'll be perfect with a cup of coffee (make sure you throw some cinnamon in the grounds!) the morning of Halloween. Rest assured, it's healthy.

Cranberry Pumpkin Bread 

Ingredients:

1) 3.5 cups all-purpose flour
2) 1 cup packed brown sugar (I cut this amount in half to cut back on sugar- w/ the cranberry sauce, it's plenty sweet!)
3) 2 teaspoons baking soda
4) 1 teaspoon baking powder
5) 3/4 teaspoons of salt (I used a salt substitute- You canNOT tell the difference!)
6) 1 teaspoon ground cinnamon
7) 1/2 teaspoon ground cloves
8) 1 cup egg substitute
9) 1 16 ounce can whole cranberry sauce
10) 1 15 ounce can pumpkin puree
11) 1/3 cup applesauce (using apple sauce instead of vegetable oil keeps the calorie count down!)
12) 1 tablespoon orange zest
* 2 tablespoons walnuts (I didn't include these because I loathe nuts in bread.)

Directions:
- Pre-heat oven to 350 F (or 150 C).
- Spray 2 8x4 baking pans with non-stick spray. (I used one 11.5x5.5 pan)
- In a large bowl, mix ingredients numbers 1-7 well and set aside.
- Mix ingredients numbers 8-12 in a second bowl.
- Combine the two bowls then pour the mixture into the baking pans. (Mixing everything together provides for a great arm workout!)
- Bake for 55 to 60 minutes or until toothpick comes out clean (My bread took about an hour and a half... maybe because of the size of my pan???)
- Let the bread cool for ten minutes before removing from pans.

Slice and enjoy with some sliced fruit and that cup of coffee I mentioned earlier!

After fueling up on your delicious bread, I bet you're ready for some spooky- inspired workout tips!  Here ya go:


Pumpkin Squats
This one is pretty self- explanatory. Holding a pumpkin (whichever weight you prefer, carved or not), squat. 100 reps. 


Frankenstein Lunges
Again, pretty self- explanatory. Simply do lunges but keep your arms straight out in front of you (like Frankenstein!) Add light weights if you're feeling particularly motivated. 100 reps (50 lunges/leg)

Witches Brew
This one is easy but there is a lot of explanation (well, more than I want to include in this post) so check out this link for an illustrated tutorial!
exm.nr/veF7WH


Corpse Pose
This is always a popular move in yoga! Just lay there on your back. Yep, just like that! Hold it as long as you wish...

And of course there are hundreds of fun songs to listen to this weekend so get up and dance to burn some calories! Here are a few to get you started (ridiculous videos included!):

- "Thriller"- Michael Jackson bit.ly/d0x110
- "Devel Went Down to Georgia"- Charlie Daniels Band bit.ly/XuDeb
- "Ghostbusters Theme"- Ray Parker Jackson Jr. bit.ly/9BvuXj
- "Super Freak"- Rick James bit.ly/55yfIF
- "Crawling"- Linkin Park bit.ly/bGKwwM
- "Disturbia"- Rihanna bit.ly/q9lAXJ
- "I Put a Spell on You"- Screamin' Jay Hawkins bit.ly/bUmMA9
- "Black Magic Woman"- Sanatana bit.ly/a4FICH


Have a Healthy, Happy Halloween!!!!!


 The bread recipe I used comes from AllRecipes.com. Find it here: bit.ly/upckKx

Wednesday, October 26, 2011

Four Meals v. One

Some say it's too expensive to eat healthy. Now, I'll admit it's easier to eat healthy if you have money at your disposal but with just a little effort, it really isn't that difficult and it certainly isn't that expensive.

Case in point: My last week. I spent less money on four, healthy, easy to make lunches than I did on the one lunch I had when I dined out. And, they were also healthier!

MONDAY- Total Cost: $6.17

I enjoyed a scrumptious meal of whole wheat noodles and tomato sauce with sardines in red basil sauce.- $4.59
1/4 cup of whole wheat noodles: $.62
1 8-ounce can of tomato sauce (no salt added): $.50
1 3.75 ounce tin of sardines in basil sauce: $1.89

For dessert (or a side, however you want to define it) I enjoyed a cup of non-fat plain Greek yogurt with 1 banana sliced up in it and dusted with cinnamon.-$1.58
                                              1 cup of yogurt: $1.25
                                              1 banana: $.33

Filtered water was my beverage. (We have a Britta filter so no extra cost there!)


TUESDAY- Total Cost: $4.78
I also put a little hot sauce on it- I'm from the South- Whaddya expect?! :)
                                         
 I had breakfast for lunch (brunch) and could barely finish it all!

 My omelet was made up of three egg whites, 1/2 tomato, two small heads of broccoli, and a slice of red pepper (chopped, of course). I sprinkled garlic powder and black pepper on it.- $2.08
3 egg whites: $1.25
1/2 tomato: $.25
2 small heads of broccoli: $.33
1 slice of red pepper: $.25

In addition, I had one cup of steel oats with 1/2 cup of rice milk, topped with a squirt of agave syrup and more cinnamon.- $2.13
1 cup of steel oats: $1.46
1/2 cup of rice milk: $.34
1 banana: $.33

To drink, I had filtered water and made a 6 cup pot of coffee (I drink it all day... working on my addiction s-l-o-w-l-y) and used a bit of creamer and two packets of a sugar substitute.- $
Coffee grounds: $.38
Sugar substitute: $.13
Creamer: $.06

WEDNESDAY- Total Cost: $3.86


A quick and easy one for Wednesday!

Brown rice: $1.09
1/2 cup of mixed veggies, sauteed: $1.72
1/2 cup of tofu, cooked with the veggies: $.72
1 apple:$.33
Water: Free!

(Entree sprinkled with soy sauce and apples drizzled with honey and powdered with cinnamon):


THURSDAY- Total Cost: $4.31

Asian-influenced meal on the cheap? Mk.

1 serving-size of Thai Coconut Ginger Rice: $1.37
1 package of Japanese Red Miso Soup: $1.39
1/2 cup of tofu, cut up and cooked in the soup: $.72
1/3 mango to top my rice: $.83
Water: Free!

On Friday, I was out and about working and parked it at one of my very favorite neighborhood Cuban dining spots. I was famished and ordered a Cuban sandwich and side order of plaintains (with a water to drink). Now, don't get me wrong, it was indeed scrumptious but... $23.00 later (including tip), I couldn't help but think, "Wow, glad I didn't eat out every day this week!"

That really adds up by the end of the week (not to mention the month!) And, it just defeats the purpose of those miles I put in on the treadmill!
I mean, let's just put it out there: Cuban sandwiches aren't exactly healthy. At the end of the day, I was glad I had balanced out that meal with my four better choices earlier in the week.


So, what do you think? Could you substitute at least one or two of your pricier midday meals for the health and economic benefits of a homemade, cheaper version? I bet you can! 

Monday, October 24, 2011

A Workout in My Kitchen: Virtual Training

Hope you had a nice weekend! I want to share with you yet another new workout I tried last week.      
                                           
                                     Introducing: Virtual Training! 

Let me assure you, this is a REAL workout... I had the soreness to prove it the following day, too! First, a little background info on how I discovered this type of workout.

A week and a half ago, I attended a Beauties on the Go event at Land Yoga. It was awesome for many reasons:

1) I participated in a free yoga class
2) I received free detox-ing advice from a professional
3) I got to catch up with my friend, G (founder of Beauties on the Go)
4) I was able to network with other fabulous female entrepreneurs
5) I won a FREE virtual training session from Ultimate You Virtual Training!


Now, I'm sure we're all well aware of the workout videos and DVDs that have been around forever... I remember I used to LUV my Mom's "Sweatin' to the Oldies" with Richard Simmons VHS tape when I was younger and I thought the girls in the workout videos and TV programs were so cool and pretty.

Oh, Olivia, you're just too cool for words!


Despite my early fascination with fitness videos you do in your home, it had just never occurred to me, as technology has advanced, that I could do a home workout with a real live person guiding me! Genius!

I expressed my excitement to the founder of Ultimate You Virtual Training, Melissa Pharr, the night of the Beauties on the Go event and we agreed to set up a workout together that weekend. Now, I want to share a few of the things I did during my workout and give you my opinion of the whole experience!

I Skyped Melissa promptly at our scheduled time and we got started right away. On the health intake form she had me fill out prior to our workout, there was a question asking which area, if any, I wanted to focus on and you know I wrote "Core!" - And, boy, did she deliver!

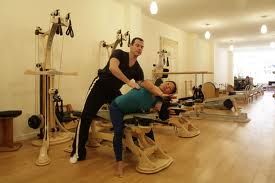
First, of course, we did some stretches. Running and doing a lot of resistance training (and being horrible about stretching) means that I'm extremely tight. Melissa was able to tell right away that I run based on my posture alone so we really focused on stretching my quadriceps (the muscles on the front of the thigh) and my hamstrings (the muscles on the back of the thigh).

We then started working on my core. Oh-mah-goooooodness..... Be careful what you ask for! Initially, Melissa had me lay facedown on my mat then prop myself up on my toes and hands, which were shoulder distance apart. Keeping my back straight and glutes tight, she had me lower down into a plank position (supporting myself on my toes and elbows, body still straight and tight) then back onto my hands ten times in a row. On their own, planks are a SUPERB way to build strength in the abs and back but doing this move ten times in a row was KILLER!


We then moved onto another exercise, still focusing on the core. This time, she had me lie down on my back with my legs at a 90 degree angle (feet facing the ceiling). She then had me alternate dropping my feet about an inch of the ground while at the same time pulling myself up into a crunch and raising the same side's arm towards the foot still in the air. For example, I dropped my right foot towards the ground and "crunched up" with my right hand towards my left foot (which was still hanging in the air). We did multiple sets of 10 for each side. Ouch. But in a good way- Promise!


The third exercise I want to share with you relates back to my legs being so tight! I know a lot of you also run so you'll find this exercise very helpful. Part of the reason my legs are so tight is due to the way that I run. There's nothing wrong with the way that I run but if I strengthen all of the muscles of my butt, particularly those on the sides, I'll depend less on my quads and hamstrings, resulting in less tightness and soreness! Win.
So it's simple. You stand with your feet about shoulder-width apart and then lean forward with one hand touching the opposite foot. Come up and repeat nine more times. This requires balance (... so I wasn't spectacular at it...) and you'll feel it in whichever muscles are your strongest. For me, when I was balancing on my left leg, I really felt it in my left calf. However, when I balanced on my right foot, I felt it in my right glute! Melissa said the gluteus muscles on my right side are probably stronger because I've learned to compensate for the weak right knee I have. Aren't our bodies so cool??? By practicing this exercise a few times a week, she says I'll start to notice my left gluteus maximus muscles catching up to my right. I'll be sure to keep you posted on that. ;)

Here's Melissa. :)


BOTTOM LINE: I think virtual training is GREAT and so is Melissa. It's really such a simple concept- a personal trainer straight to you rather than having to go into a gym or studio. Melissa was telling me that a lot of her clients are very busy executives who travel on business often and cannot make it to see a personal trainer often. Instead, they have a standing appointment to "meet" her on Skype a couple times a week from wherever in the world they happen to be! I can see how even people who don't have to hit the road for business often would prefer this method- busy Moms who only have spare time when they put their kid down for a nap or people who may work in an office but go in early and stay late, making stopping by the gym less than appealing. Really, you can be anywhere (as long as there's enough space to move) and you can work out with her- No excuses! :) I intend to schedule workouts with her in the future when I travel.

I especially love that all of my readers, no matter where you are (and I know a lot of you are very far away from my home base of NYC) can take advantage of Melissa's wonderful workout.

Please visit her website for more details, to contact her directly, and to sign up for a FREE fitness breakthru session with her! You'll be hooked, too!

LINKS: 
- Ultimate You Virtual Training with Melissa Pharr: www.VirtualTraining.MelissaPharr.com/
- Beauties on the Go: www.BeautiesOnTheGo.com/ (Networking in NYC)
- Land Yoga: www.LandYoga.com/ (Yoga in NYC)
- SohamWellness: www.SohamWellnessNYC.com/ (Detoxing)

Tuesday, October 18, 2011

You Had Me At "Maple- Mustard"...

Hey everyone! Ready for a recipe that'll be sure to please, is healthy, and is pretty easy to make?! Thought so. 

Introducing Maple- Mustard Baked Chicken! Oh-em-gee... Delish and just what I needed to settle in at home after a long day of running around for work. I also snagged a super easy recipe for sweet potato fries to accompany my chicken, threw some sauteed veggies into the mix, and finished it off with non-fat apricot  Greek yogurt and blackberries for dessert.

I. Assemble the ingredients.

For the chicken dish: 
- 3 tablespoons of dijon mustard
- 2 tablespoons of pure maple syrup, preferably Grade B (I couldn't find it and used plain syrup... turned out fine though I'm sure the Grade B would have added a bit more sweetness!)
- 2 tablespoons of peanut oil, divided
- 3/4 teaspoon fresh ground pepper
- 1 package of chicken tenders
- 1 1/2 cups of fresh, whole-wheat bread crumbs

For the sweet potato fries:
- 1 small-medium sized sweet potato                       
 - A pinch or two of sea salt
 - Freshly ground black pepper, to taste
 - Quality olive oil
   
For the veggies:
- A handful of fresh, chopped veggies for sautéing
- Olive oil to drizzle on the pan
- Garlic and black pepper, to taste

For Dessert:
- 1 serving size of non-fat apricot Greek yogurt
- 3 blackberries, washed and dried

II. In a bowl, whisk the mustard, maple syrup, 1 tablesoon of peanut oil,
thyme, pepper, and salt together. Add the chicken and coat evenly. Then
allow to marinate for 30 minutes to 6 hours.
I marinated mine for about 35 minutes.
                                               
III. Preheat the oven to 425 degrees. (The chicken recipe calls for 400 and the sweet potato recipe calls for 450 so I split the difference. Worked out for me!)

Wash the potato (and dry it off very well!) then slice it into large "fries". Slices should be 1/2 an inch to 3/4 of an inch thick. Place them on a baking sheet. (And don't forget to space them out and to leave half the sheet for your chicken!)

Sprinkle with your sea salt and fresh ground pepper. Drizzle them with olive oil.

Now that the oven is heated, bake them for ten minutes. After ten minutes, take them out, flip them and put them back in for another ten or fifteen.


IV. Back to the chicken.

For the first ten minutes of baking the sweet potato fries, focus on your chicken. Combine your breadcrumbs and the rest of your peanut oil then coat your chicken.

When you take your sweet potato fries out to flip, add your chicken to the pan.

Again, bake for ten to fifteen minutes then take out the fries. The chicken will probably need a few more minutes of cooking so you can do as I did and place the piping hot fries in a bowl, sprinkle them with cinnamon, cover them with a napkin, and place them in the microwave to keep them warm.
                                             (Note: You're not turning the microwave on here- Just using it place your 
                                              fries for a few minutes.)

V. While your chicken continues cooking and your fries are being kept warm,
go ahead and drizzle a pan with a little olive oil and sautee your veggies. Throw a pinch of garlic and some pepper in the mix if you wish!

The veggies and chicken should be finished around the same time so plate them along with your delish sweet potato fries!


VI. Almost finished! Pour your yogurt into a bowl and top with your blackberries....

                                                                                                     Eat up! 


I hope you enjoy this meal as much as I did! Also, unless you're sharing, you'll probably have some chicken left over. It goes quite nicely with rice for lunch the next day! :)


I'd love to take all he credit for this delightful meal but I simply can't. Here are links to the two websites I found them on:
- Maple- Mustard Chicken: http://www.eatingwell.com/recipes/maple_mustard_baked_chicken.html and
- Sweet Potato Fries: http://www.instructables.com/id/Perfect-Oven-Sweet-Potato-Fries/?ALLSTEPS

Friday, October 14, 2011

I Listen to YOU!!!!

Hey everyone!

So, I've gotten a LOT of feedback on my very first vlog and it was all so positive- Thank you, Thank you, Thank you! Ya'll are amazing to humor this little project of mine and I'm so happy you're enjoying it!

Several of you also mentioned that, while you did think the vlog was wonderful, it was just too dang long. I agree.

So, here you have it! I've condensed the original 20 minute video (what was I thinking??? You don't have time for that in your busy lives!) down to just under seven minutes. In the vlog world, that's still long but it is certainly more do-able, no?

So friends, please enjoy the new and improved video and THANK YOU for your feedback! I'm so flattered you're making LaFemmeFITalle a part of your fitness life! 


P.S. Also, thank you for the fantastic workout ideas some of you suggested! I'll definitely be looking into them and I'm all ears for any others you have! 

Tuesday, October 11, 2011

42 Flights AND a Vlog!

Thanks so much for checking out the FIRST video here on LaFemmeFITalle! This video is also available on the LaFemmeFITalle YouTube channel: http://www.youtube.com/watch?v=JeYj6-FEpLo

As always, thanks for all of your support, encouragement and feedback! 

Enjoy!

Sunday, October 9, 2011

WANTED: Fabulous Gym!

 Hey everyone!

Just a quick post for you today. Despite the AMAZING weather we've been having here in the City for the past few days, I'm well aware that it is going to very cold very soon and having a gym to resort to will be necessary as my runs and workouts outside stop looking so dang appealing. So I find myself pondering what is the most important thing to me when committing to a gym (ahem, and a monthly fee!)

Gym memberships in Manhattan can become astronomical in price and that's just for the barebones minimum. Toss in private trainers and classes at some of the elite gyms and it's more than many pay for rent in some cities! I'm not interested in that. Here's the top three most important aspects when I look for a gym to join:

1. PRICE
K, let's just start out here. As I said, gym memberships can be crazy high here. Perhaps it's worth the money for some because the high cost incentivizes them to use the gym or they really need a posh place to get their sweat on or maybe their company includes a discounted price for membership to a swanky place (I'm so jealous. There, I said it.). Me? I'm a pretty simple gal (and a freelancer so no company discount to speak of! Wah.). As long as my gym is a safe, well- maintained environment, I'm happy. $100 is the absolute most I'd pay for a gym membership.

2. PROXIMITY: 
It has to be convenient for me to go. Again, when the weather is freezing, it's a feat to leave the apartment for anything other than what's totally necessary. I need a gym that is close by, leaving no room whatsoever to justify not going. (Gosh, I'm already grieving the gym I had IN my building last year... Sigh.) Luckily, there is no shortage of gyms in NYC so this aspect is easily covered!

3. CLASSES
This is definitely a new phenomenon for me. I never was a "class" type before. In fact, I think that's one reason I'm having so much fun with LaFemmeFITalle- Trying out new classes is totally outside the box for me and I've learned that I actually have a lot of fun! I still love zoning out on my own, too, but I want to know that whichever gym I go with has plenty of options for those days when I'm feeling a bit more sociable.


So what do you think? Have I covered all of the bases? What do YOU look for when considering joining a gym?                                                                                                 


Tuesday, October 4, 2011

A Little Bit of Yoga, A Pinch of Pilates, and a Dash of Dance= Gyrotonics!

I bought a five-package class deal using LivingSocial and have waited until I attended all five classes to report back to you. This post is broken down by describing what Gyrotonics is, the format of the class, and my final thoughts on it as a workout. 


GYROTONICS:
"Are you ready for a new home in your body?"- That's what the website for Body Evolutions states straight off the bat. Pretty big talk.

I arrived at Body Evolutions studio located in Manhattan's Lower East Side neighborhood this morning for my one-hour group Gyrotonics Tower class. Per their directions, I arrived a little early to fill out  some paperwork, apply my LivingSocial voucher, and settle in.


The studio is one large room with a small reception area in the front and filled with Pilates and Gyrotonics Towers throughout the rest of it. Owner/trainer, Bill Macagnone, greeted me as I entered and told me a little more about gyrotonics. Before seeing it on LivingSocial, I'd never even heard of it- Bill didn't seem surprised by that. First he asked me if I did any other type of workout- I said yes of course and he told me that was great because Gyrotonics is a mixture of Pilates, yoga, and dance. Using the term "workout" loosely, Bill explained that Gyrotonics isn't like a normal workout but, rather, an activity to warm up your joints and that it will further enhance all of your other workouts and even your everyday posture. Cool- I like to sit up straight.

Though Bill is a well-known Gyrotonics trainer, he didn't create the program. In the 1970's, a ballet dancer named Juliu Horath designed the program to rehabilitate himself after injuring his Achilles tendon. According to Wikipedia: "The exercises are intended to be fluid and rhythmic, using specific breathing patterns that Horvath claims cleanse, detoxify, and rejuvenate the entire body."


THE CLASS: 
We usually had a full class (four or five people) and our teacher, Mor, a perfectly toned Israeli woman, led us to the back and set each of us up at our own Gyrotonic Tower. Me, being the total newbie in the first class, had no idea what I was doing and had to be told which direction to sit. Luckily, everyone was very helpful. Mor first led us in breathing and stretching exercises. I felt... like a fool. Everyone else was into it, though, so I tried to be. We sat up straight, our shoulders relaxed, with each leg on either side of the bench of our tower and moved our upper body in big circles to stretch out. Is it just me or does it always feel weird to be in a class and hear people exhaling dramatically?

After breathing and stretching, we got started but to be honest, the "workout" felt like one prolonged stretching session for the most part. We used the machine first by sitting with our back to the wall and placing our hands directly in front of us on the dials of the Gyrotonic Tower. We then performed these very exaggerated rotations of the dials with an emphasis on keeping our spine long and our breathing deep. I honestly felt nothing except a little bit bored. I don't know, this just wasn't the "workout" I was expecting. I was encouraged when we were told to put the Gyrotonic Tower straps on our arms and feet because I knew we'd be working with some resistance at least. The real challenge came in controlling the straps with your limbs. The moves themselves (lots of circles- big, medium, and small) are not complicated or difficult... until you slow down and really control them, rather than just swinging your arms or legs (whichever you're working out at the moment) around. We never went above controlling 20 pounds and I think working with about 30 or 35 pounds would've suited me better. I don't want to bulk up (just tone up!) but 20 really did feel a bit light.

Photo courtesy of Body Evolutions. That's not me but that is Bill!


MY FINAL THOUGHTS: Ok, so Gyrotonics doesn't suit me. Let's just put that out there. I like more intesity when I'm working out and tend to get a bit bored if the class lacks it. In fact, I waited weeks to finish this post because I just wasn't very inspired.

There is, however, one effect I credit to Gyrotonics that I whole- heartedly miss about the class and that is the huge difference it made in my posture. Friends and random people were commenting on it during the five weeks I took the class, even asking if I was a yoga or pilates instructor! I think that the emphasis on keeping a straight spine during the hour- long class carried over into my daily life which is just awesome! Obviously, I can work on my posture on my own time without taking a Gyrotonics class every week but it came effortlessly while attending them so if you're someone who has trouble with that, Gyrotonics might be for you! Also, in a similar vein to yoga, I definitely felt very zen during my time there. The instructors, Bill, and most of the other students were all positive, upbeat people who were there to focus on their mind and body... making it that much easier for me to feel comfortable doing the same!

I doubt I'll take another Gyrotonics class again anytime soon but if I did, I'd check out Body Evolutions again in a heartbeat!